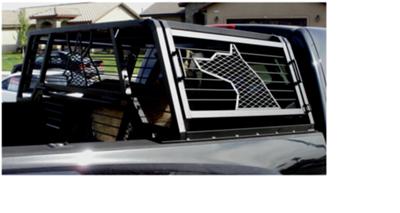
NEW AND IMPROVED TRUCK BED DOG TOPPER
by John K. Dunn
(Fresno, Ca.)

Soon to be registered....."KATY KAGE". Namesake of a Queensland I had for 16 years.
This sequential, slip-fit, breakdown design I came up with, allows me to remove or install it with ease in less than 10 minutes. Even my wife, at five foot two, can do it. Six pieces total. The side panels slide up and out; and the top slides out seperately so I can get to my dogs in a hurry if I need to.
After the side panels and the top have been removed, the gate slides out from the rear panel and the rear panel slides out from the bedrail caps. The bedrail caps are bolted into the front stake pockets with a "downtube" and clamped to the rails in the rear, with some really cool railclamps that I desinged.
The front has a crossbar that is bolted to the top of the forward pillars, which are welded to the bedrail caps for support of the top panel. Six bolts total for the whole assembly.
The top is six, finished and sealed redwood planks, with 1'x 1'x 3/16 angle strips binding the boards together at four places. Couldn't make the top metal for obvious reasons.
Built the whole thing with a $139.00, 230V mig machine from Harbor Freight(works great!). A DeWalt chop-saw and a 4 1/2" DeWalt angle grinder. Used .030 and .023 hard wire with 75/25 shielding gas.
Materials are 1" and 1 1/4" .065 wall square tubing, 9x3/4" flat expanded metal, 1/8"x1/2" u-edging and 1/4" cold-roll round. Had the whole thing powder coated in "crinkle" flat black.
I'm here to tell ya, I faced more than a couple of challenges designing and building this thing.
The criteria was such that it be strong, lightweight, affordable, user friendly and of reasonable quality.
I found the thin,.065 wall tubing to be VERY unforgiving. Finding the right sequences to fit and weld everything, while keeping it straight and true, really gave me fits.
I also learned that if I wanted a 1D, or even a 2D bend, in .065 wall square tubing(without distortion), I'd have to do it by cutting and welding it in segments. As it turns out, it left me with an "un-refined" look that I really like. I didn't worry about grinding away the welds(and losing joint strength) to get a smooth, finished appearance; just knocked the tops off with a flapper wheel. Left it with a real "industrial", tough looking finish.
As far as the welding is concerned, I found that the innershield wire runs a little too hot for the thin material and couldn't be manipulated like the hard wire.
This project has turned out to be very rewarding and enjoyable for my dogs.... and UNBELIEVABLY theraputic(?) for me(almost three years without a drink). I have learned as much, if not more about the builder, than I did about makin' dog cages.
Your website has been both informative and inspiring to me and as corny as it might sound, has helped "nurse" me back to my potential.
I am grateful for your time and energies.
Thank you.
J. Dunn
John,
I am humbled...great work.
jody


