Mig Welding Basics Part 3
Setting wire speed and Voltage without a chart
How do you set wire speed and voltage without a chart and on pretty much any mig welding machine?
In this weeks video, I am showing a method for setting wire speed first based on the thickness being welded. After that, voltage is set while welding on a piece of scrap metal that is about the same thickness as the task at hand.
IF you missed parts 1 and 2 of mig welding basics, click here
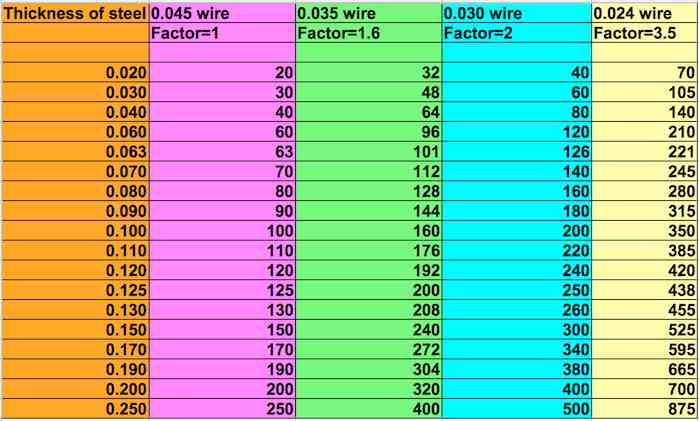
Check out the chart below and keep in mind, this chart is intended for short circuit mig welding of carbon steel.

Here is how it works....
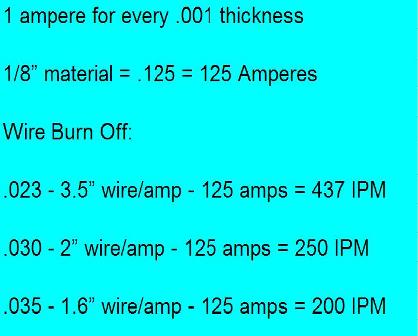
Based on the 1 amp per 1 thousandths of thickness of the metal being welded, there is a number that can be used for all the popular wire diameters that will give you a good starting point for wire speed.
For .045" wire the number is 1
For .035" wire the number is 1.6
for .030" it's 2
.023/.024" the number is 3.5
So the example giving is 1/8" or .125" thick steel.
For .030 wire, 125 x 2 = 250 ipm. Simple. right???
Determine the wire speed set by pressing the mig welder trigger for 6 seconds, measuring, and adding a zero on the end.
(25 inches of wire equals 250 inches per minute)
This is a very accurate method of measuring wire speed if you use a stopwatch. I used the stopwatch on my phone and I measured several times while filming this video and the results were very consistent.

more on mig welder settings...
Here is how I set my voltage and wire feed speed (wfs) for short circuit mig welding of carbon steel.
- Determine the thickness of the metal I am welding.
- multiply the thickness in .001" (thousandths) times the appropriate number for the wire diameter I am using.
- dial in my wire speed by using a stopwatch and tape measure.
- get a piece of scrap the same thickness as my job
- dial in the voltage to get the bacon sizzling sound
- weld the dog crap out of it.
This works for me but its not the only way to set up a mig welder
After several years of welding, I settled on this method because it works on most mig welders...
Not matter if there is no numbers or markings on voltage or wire speed knobs.
Rulers and tape measures do not lie.
Digital readouts sometimes lie. They can be off quite a bit.
But on a basic mig welder, one without fancy settings or synergic settings...pressing the trigger for 6 seconds and measuring the wire is a tried and true method for measuring wire feed speed.
All you do after that is dial in the voltage by welding on a piece of scrap metal.


