How to TIG Stainless
scroll down for videos


Mastering TIG Welding Stainless Steel: The Four Essential Factors for Quality Welds
- HOME
- Tig Welding Stainless
- Tig Welding Stainless Steel
- How to Tig Stainless


TIG welding stainless steel requires more precision than welding mild steel or aluminum. While stainless offers excellent strength and corrosion resistance, improper welding techniques can compromise its properties. Discoloration, warping, contamination, and oxidation are common issues that occur when stainless steel isn’t welded correctly.
To achieve strong, visually clean, and corrosion-resistant stainless welds, you must focus on four key factors:
- Gas shielding to prevent oxidation and excess discoloration
- Preventing distortion
- Purging the penetration side with argon
- Maintaining stainless properties
Mastering these will not only improve the quality of your welds but also ensure that your stainless steel work maintains its durability and corrosion resistance. Let’s break down each factor and how to apply it effectively.
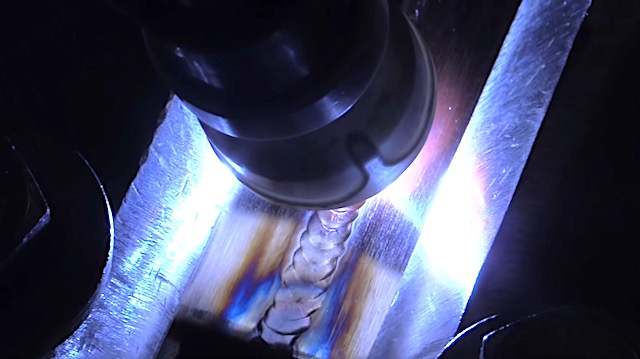
1. Gas Shielding to Prevent Discoloration
One of the most common problems in stainless steel TIG welding is heat tint or oxidation, which appears as a discoloration near the weld bead. This happens when stainless is exposed to oxygen at high temperatures, causing the chromium in the material to oxidize and lose its corrosion resistance.
How to Ensure Proper Gas Shielding
Stainless loves argon
✔ Use 100% Argon – Stainless steel TIG welding requires pure argon
✔ Set Proper Flow Rates – Argon Flow rate is mostly determined by cup size used. Typically, 2-3 CFH (cubic feet per hour) per cup number is ideal, but if you're welding outside or in a drafty area, you may need to increase the flow slightly. example: a #10 cup requires 20-30 CFH
✔ Use a Gas Lens – A gas lens improves argon coverage by creating a laminar flow, reducing turbulence, and providing a more even shield around the weld.
✔ Hold a Tight Arc – Keeping a short arc length (aim for equal to your tungsten diameter) helps maintain good gas coverage over the molten puddle and prevents atmospheric contamination.
If gas shielding is poor, the weld will turn blue, brown, or even black, indicating excessive oxidation. This weakens the stainless steel’s corrosion resistance and requires additional cleaning with a stainless steel wire brush or a weld cleaner like an EASYkleen or Surfox system.
2. Preventing Distortion in Stainless Steel
Stainless steel distorts more than carbon steel.
Unlike mild steel, stainless steel has low thermal conductivity, meaning heat doesn’t spread as evenly. Instead, heat concentrates in the weld area, causing the material to expand and contract rapidly, leading to warping and distortion.
How to Minimize Distortion
✔ Use a Lower overall Heat Input – Both amperage and travel speed affect overall heat input. Stainless retains heat longer than carbon steel, so using too much amperage will cause excessive warping. Start with 1 amp per 0.001" of material thickness ( up to around .125") and adjust as needed. Get your puddle established and get traveling within 2 seconds.
✔ Backstep Welding Technique – Instead of welding from one end to the other, weld in short sections in the opposite direction to spread out heat evenly.
✔ Clamp the Material Properly – Use heat sinks, chill bars, or strong clamps to hold the workpiece in place and absorb excess heat.
✔ Use Pulsed TIG Welding – If your machine has a pulse function, set it to around 1-2 pulses per second to reduce heat input while maintaining good fusion.
Preventing distortion is key to maintaining the structural integrity and aesthetics of stainless steel welds, especially on thin materials like exhaust systems, food-grade piping, and aerospace components.
3. Purging the Penetration Side with Argon
When welding stainless steel pipe, tubing, or sheet metal with full penetration, the back side of the weld is exposed to atmospheric oxygen, leading to oxidation and contamination. To prevent this, argon purging is used to flood the back side of the weld with shielding gas.
How to Properly Purge Stainless Welds
✔ Use a Low Flow Rate – A flow of 5–10 CFH is usually enough to displace oxygen without wasting gas. higher flow rates can be used at first to speed up the purging time and a diffuser helps
✔ Seal the Area – Use aluminum tape, high temp powder coat tape, or purge plugs to keep argon inside and prevent air from re-entering.
✔ Purge Until the Weld Is Fully Cooled – If you remove the purge too soon, oxidation can still occur. Keep the purge running until the metal cools below 250°F.
Without proper purging, the weld’s back side will have excessive oxidation (sugaring), weakening the joint and reducing its corrosion resistance. A good purge is critical for sanitary welds in food, pharmaceutical, and chemical applications, where contamination must be avoided.
4. Maintaining Stainless Properties After Welding
Stainless steel gets its corrosion resistance from chromium content (at least 10.5%), which forms a protective chromium oxide layer when exposed to air. However, improper welding techniques can damage this layer, making stainless steel vulnerable to rust and corrosion.
Best Practices for Maintaining Stainless Properties
✔ Avoid Carbon Steel Contamination – Never use the same wire brush or grinding tools on stainless that were used on carbon steel, as this can transfer iron particles, causing rust spots later.
✔ Pickling & Passivation – If heavy oxidation occurs, use pickling paste to remove it and passivation solutions to restore the chromium oxide layer.
✔ Use the Right Filler Metal – Match the TIG filler rod to the base material (e.g., ER308L for 304 stainless, ER316L for marine-grade stainless).
By following these steps, your stainless welds will remain strong, clean, and corrosion-resistant, ensuring they perform as intended in any environment.
TIG welding stainless steel isn’t just about melting metal together—it’s about protecting the material while achieving the best possible weld quality. If you master gas shielding, distortion control, purging, and stainless preservation, you’ll consistently produce clean, strong, and professional-grade welds.

You might like these
Discolored Stainless Steel Welds - What causes gray welds?
Discoloration in Stainless Welds - What causes discolored stainless steel welds
Would you like to get free welding videos in your inbox every week?


Tig FingersThe Real and Original TIG Finger® and XL model
Stubby Gas Lens and Pro TIG kits
2% Lanthanated, CK LaYZr, Purple, more
Our Weldmonger Stubby Gas Lens kit is the Best


